สร้างแอปฯสั่งอาหารบน Android ตอน 2
จากตอนที่แล้วที่ค้างไว้อยู่กับการสร้างแอปฯเพื่อทำ ออเดอร์อาหารสำหรับร้านอาหารบน Android ใครยังสนใจอยู่มาดูต่อ ๆ หรือหากใครเริ่มท้อลองโทรมาปรึกษากันได้นะครับ พวกเรา Twin Synergy พร้อมให้บริการ หรือจะจ้างก็ได้นะ รับรองคุณภาพคับแก้ว!!
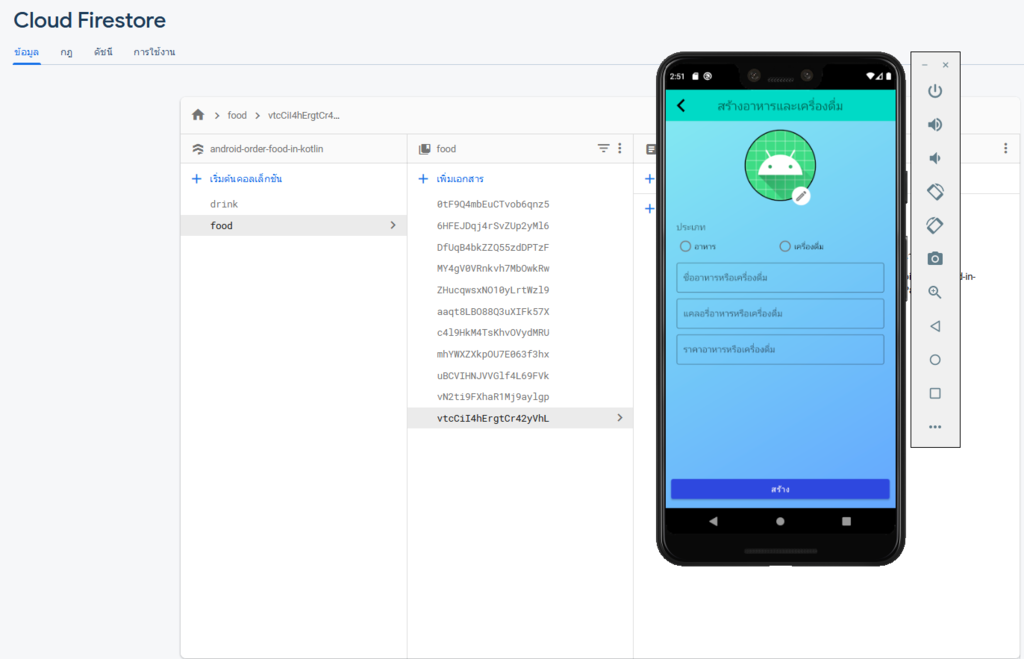
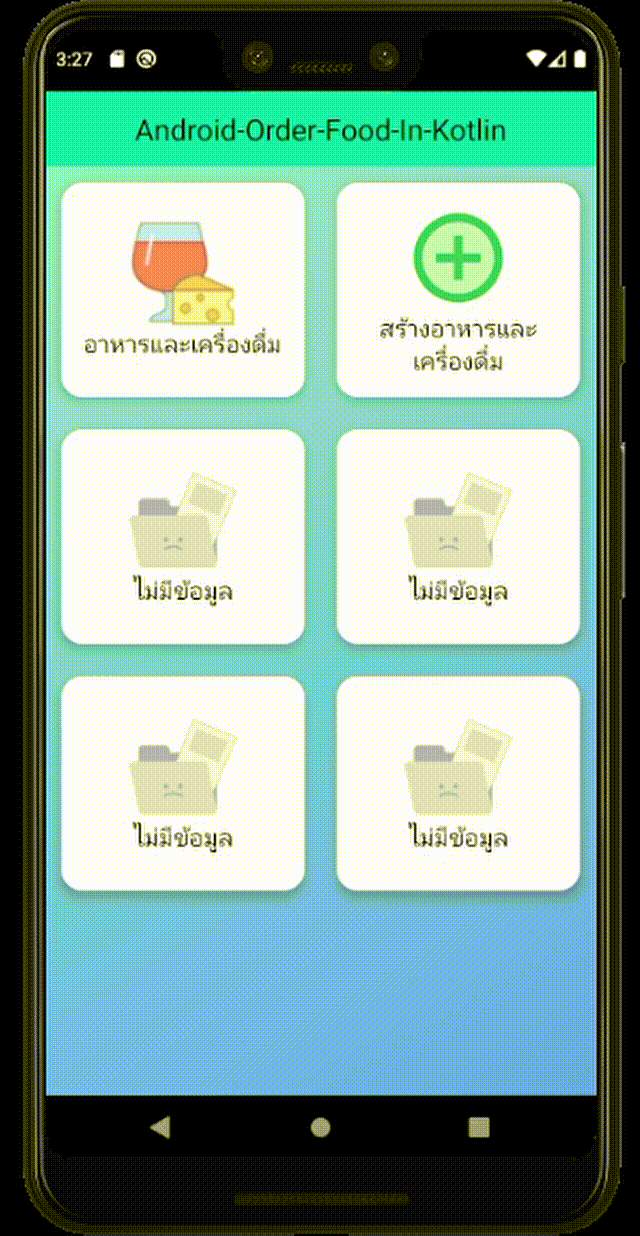
ครั้งที่แล้วเราได้สร้างหน้า Dashboard กับ หน้ารายการอาหารและเครื่องดื่มไปกันแล้ว แต่ยังไม่มีข้อมูลที่จะนำมาแสดง ในตอนที่ 2 นี้ เราจะมาสร้างข้อมูลกัน พร้อมกับติดตั้ง Firebase สร้าง Cloud Firestore กับวิธีเพิ่มข้อมูลลงใน Cloud Firestore โดยผ่านแอป ส่วนรูปภาพ เราเก็บใน Cloud Storage for Firebase กันน่ะครับ
การสร้าง Cloud Firestore เพื่อใช้งานในโครงการ
ในขั้นแรกเราจะมาสร้าง Database เพื่อที่จะใช้งาน Cloud Firestore กันก่อน ในการใช้งาน ทุกคนต้องมี gmail กันก่อนน่ะครับ เพื่อสามารถ Sign in เข้าใช้งานได้ ขั้นตอนต่อมา เราไปที่เว็บ https://firebase.google.com กันเลย
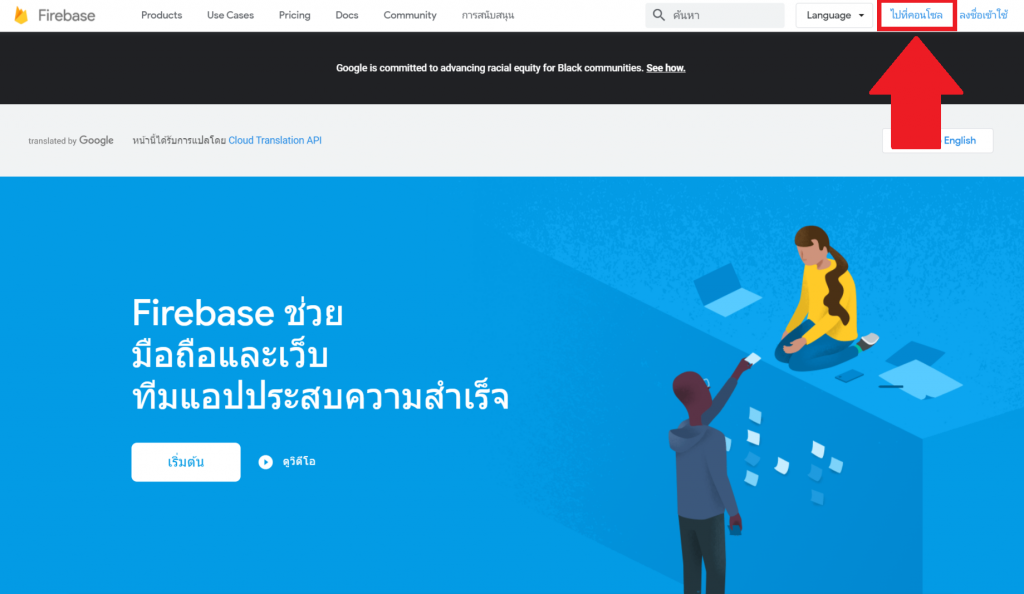
Sign in เสร็จแล้ว จากนั้นคลิก GO TO CONSOLE เพื่อที่จะเข้าไปสู่หน้าถัดไป
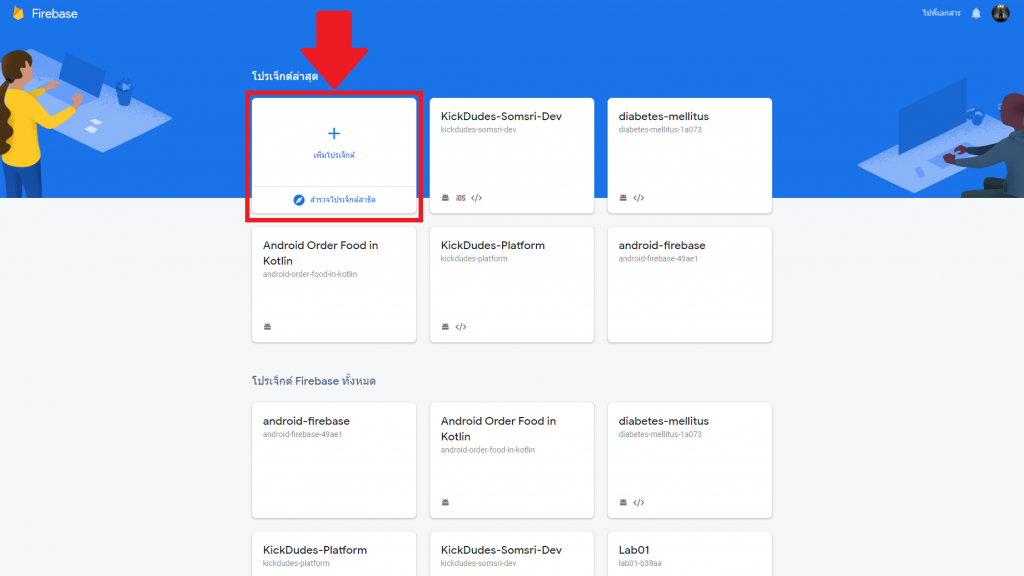
สำหรับใครที่พึ่งเข้ามาใช้งานครั้งแรก เราจะไม่มีโปรเจคใดๆ ให้คลิก เพิ่มโปรเจค เลยครับ
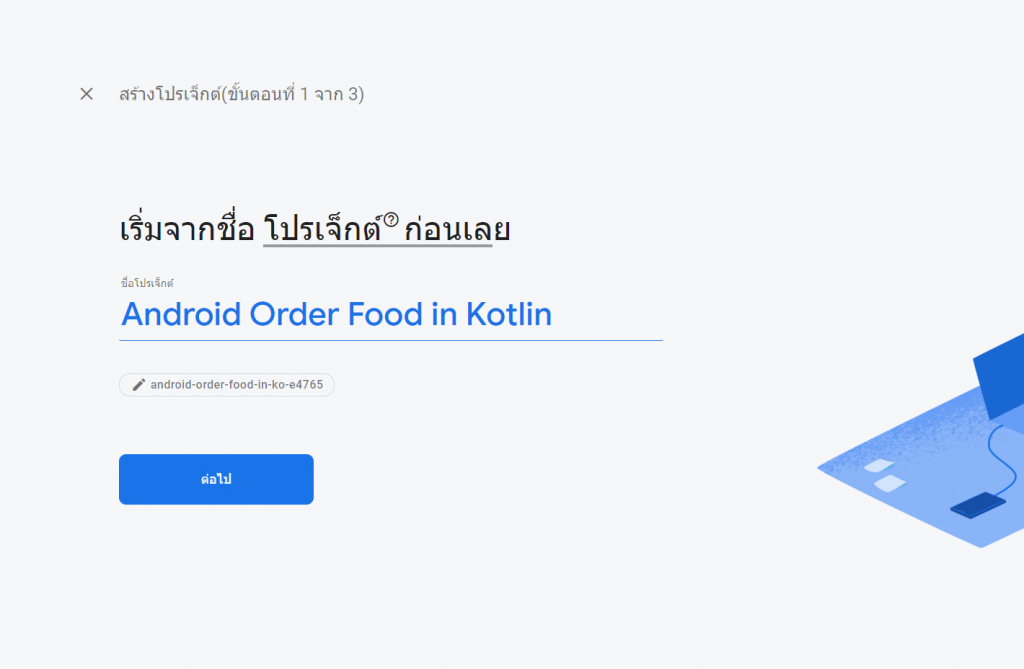
ใส่ชื่อ โปรเจคที่ต้องการ แล้ว คลิก ต่อไป
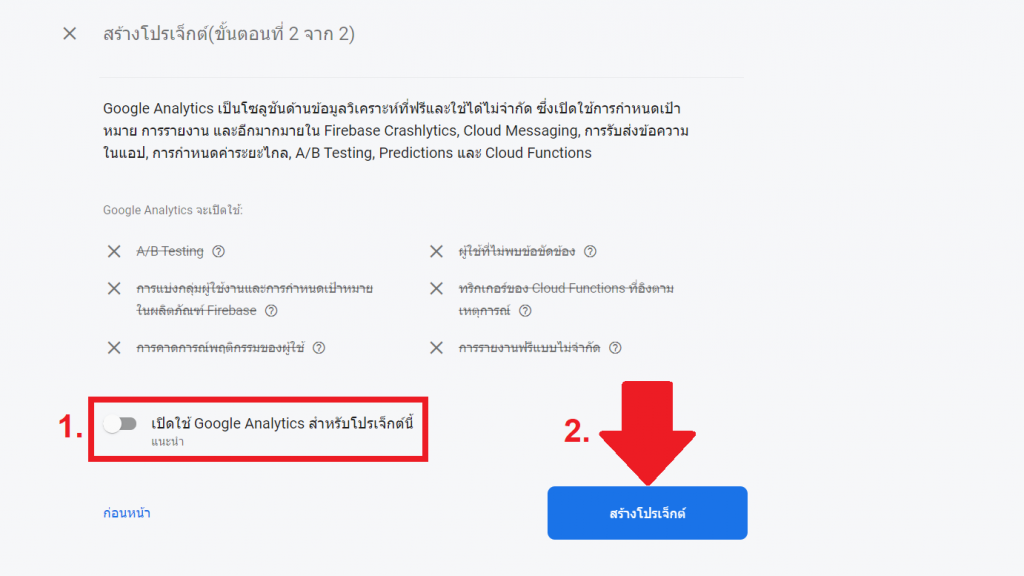
ขั้นตอนที่ 1.เลือกปิดใช้ Google Analytics สำหรับโปรเจ็กต์นี้ น่ะครับ 2. คลิกสร้างโปรเจคเลยครับ
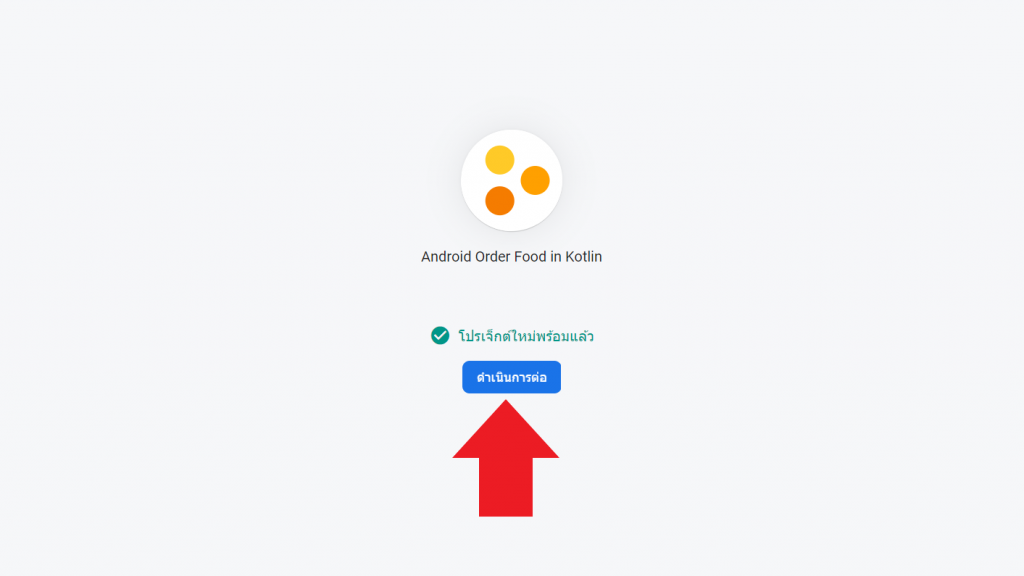
เมื่อเห็นหน้านี้ แสดงว่าเราได้สร้าง Project กับ Firebase เรียบร้อยแล้ว คลิกดำเนินการต่อเลยครับ แล้วจะปรากฏหน้าภาพรวมโปรเจค
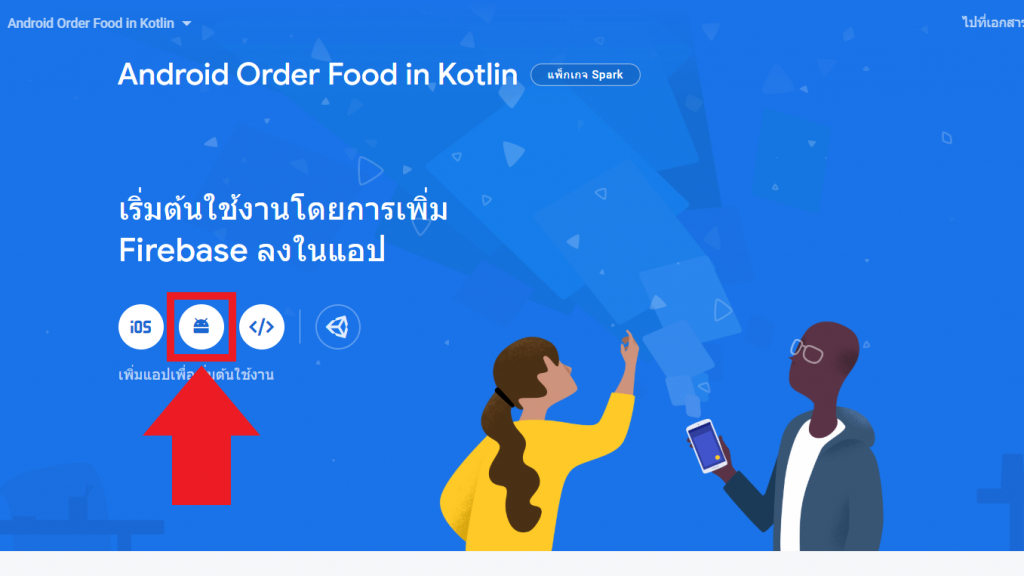
เราจะมาเพิ่ม firebase ไปยังแอป android กัน ให้คลิกเพิ่ม แอป Android ที่รูป android
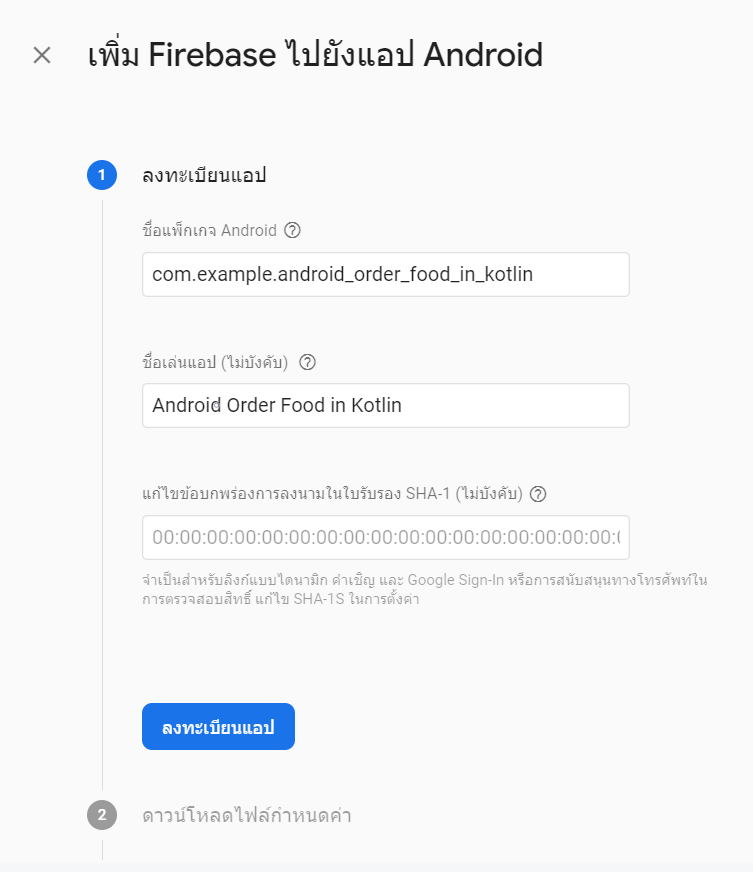
ใส่ชื่อ Package ของแอพพลิเคชันของเราลงไป พร้อมตั้งชื่อเล่นแอป ให้กับ Project แล้วคลิกที่ ลงทะเบียนแอป
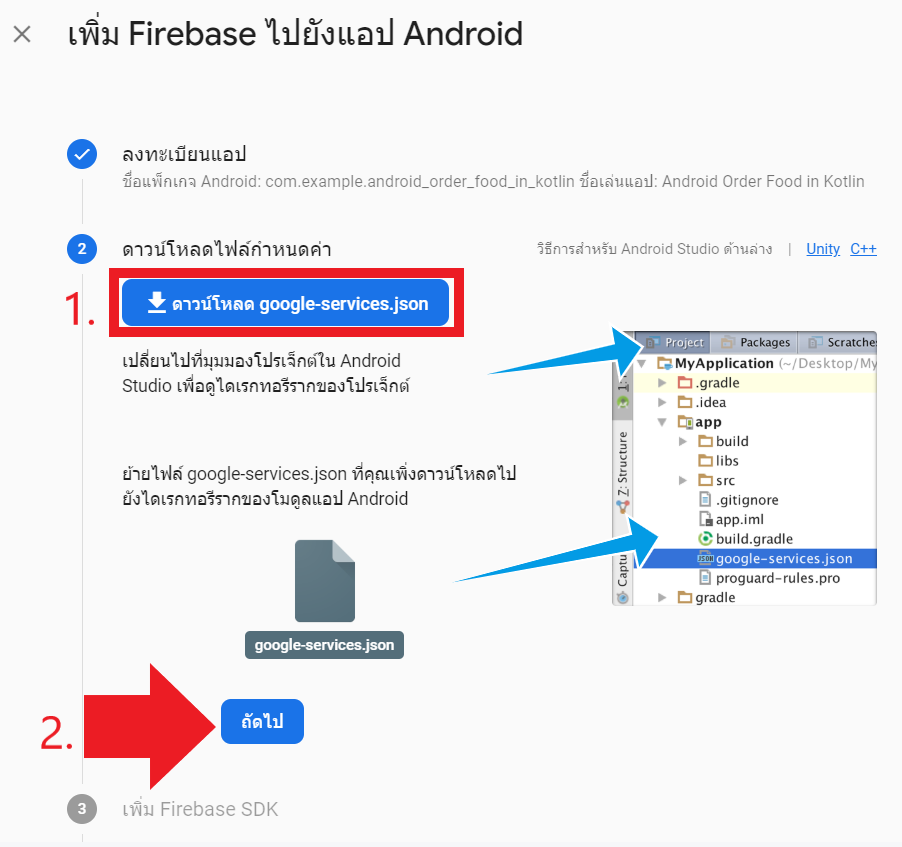
- คลิกดาวน์โหลด google-services.json แล้ว ไปที่ Android Studio เปลี่ยนไปที่มุมมองโปรเจค เป็น Project เพื่อดูไดเรกทอรีรากของโปรเจค แล้ว ย้ายไฟล์ google-services.json ที่คุณเพิ่งดาวน์โหลดไปยังไดเรกทอรี app ของโปรเจคเรา เมื่อทำขั้นตอนนี้ เสร็จแล้ว
- ให้คลิก ถัดไป
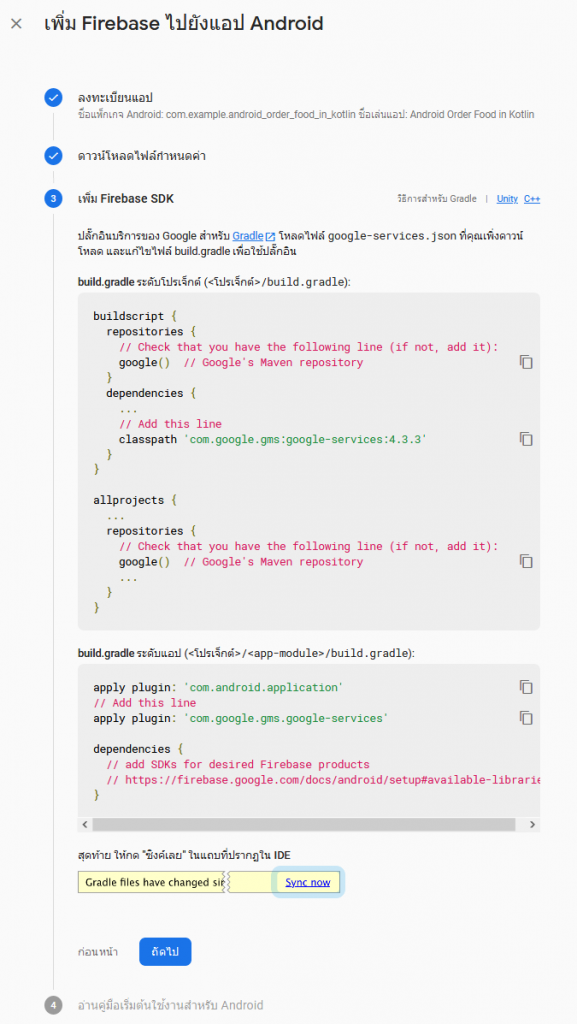
build.gradle(Project)
buildscript {
  repositories {
    // Check that you have the following line (if not, add it):
    google()  // Google's Maven repository
  }
  dependencies {
    ...
    // Add this line
    classpath 'com.google.gms:google-services:4.3.3'
  }
}

allprojects {
  ...
  repositories {
    // Check that you have the following line (if not, add it):
    google()  // Google's Maven repository
    ...
  }
}
build.gradle(Module: app)
apply plugin: 'com.android.application'
// Add this line
apply plugin: 'com.google.gms.google-services'

dependencies {
  // add SDKs for desired Firebase products
  // https://firebase.google.com/docs/android/setup#available-libraries
}
สุดท้าย ให้กด Sync now (ต้องใช้เวลาสักพัก) ระหว่างนั้นให้กลับมา Firebase กันต่อ คลิก ดำเนินการต่อที่คอนโซล กลับมาที่หน้าภาพรวม firebase
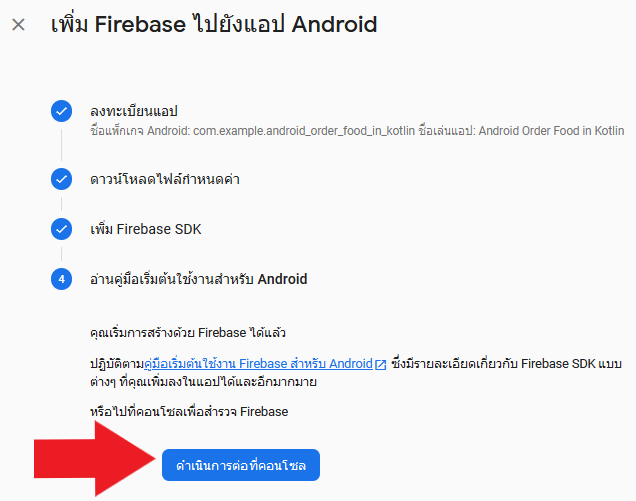
ตอนนี้เราได้เพิ่ม firebase ไปยังแอป android แล้ว เราจะมาเริ่มใช้งาน Cloud Firestore กันครับ

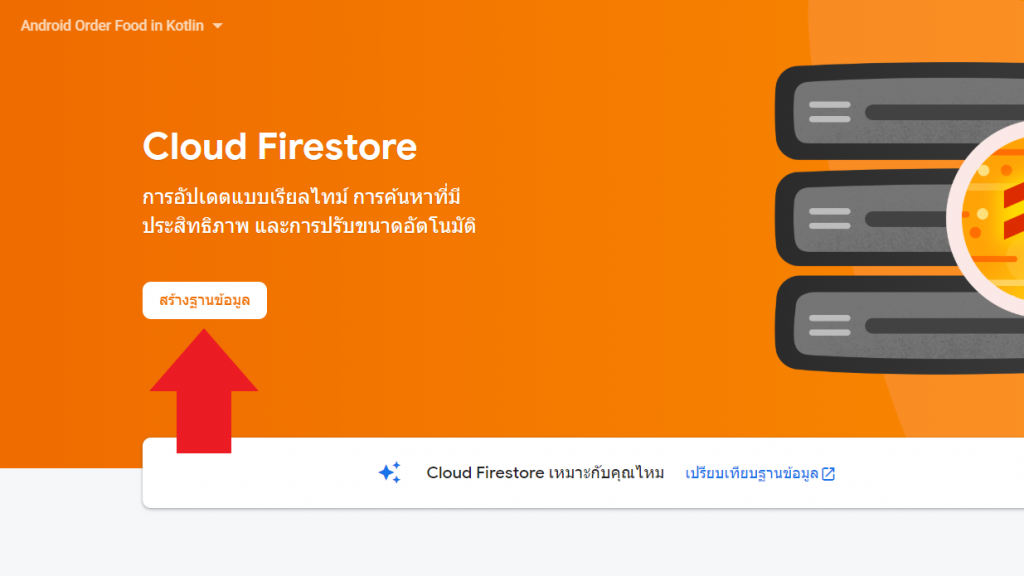
คลิกที่ Cloud Firestore เราจะมาสร้าง Cloud Firestore กัน
Cloud Firestore for Firebase คืออะไร หลักการทำงาน สามารถอ่านได้ที่ เข้มข้นกับ Cloud Firestore ระบบฐานข้อมูลที่เปิดตัวใหม่ล่าสุดจาก Firebase แบบจัดเต็ม
คลิก สร้างฐานข้อมูล แล้วปรากฏหน้าขั้นตอนการสร้างฐานข้อมูล
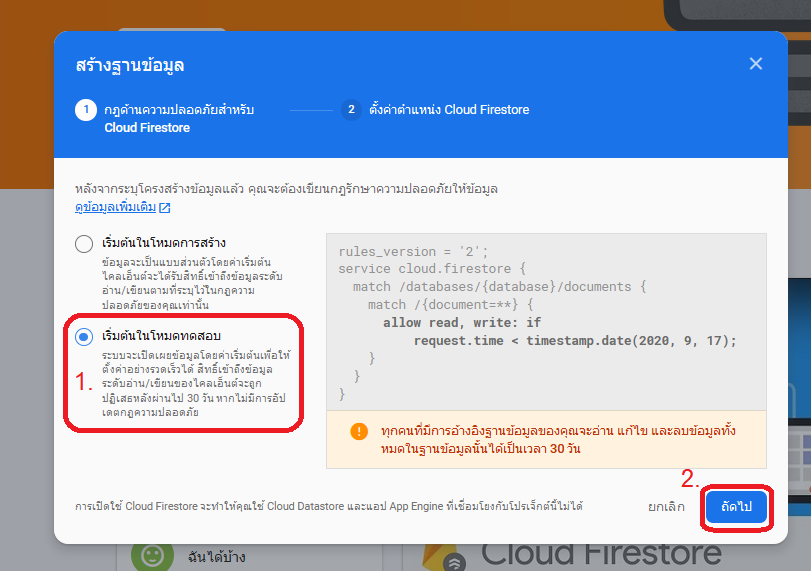
ขั้นตอนที่ 1. คลิกที่ เริ่มต้นในโหมดทดสอบ 2. คลิกถัดไป

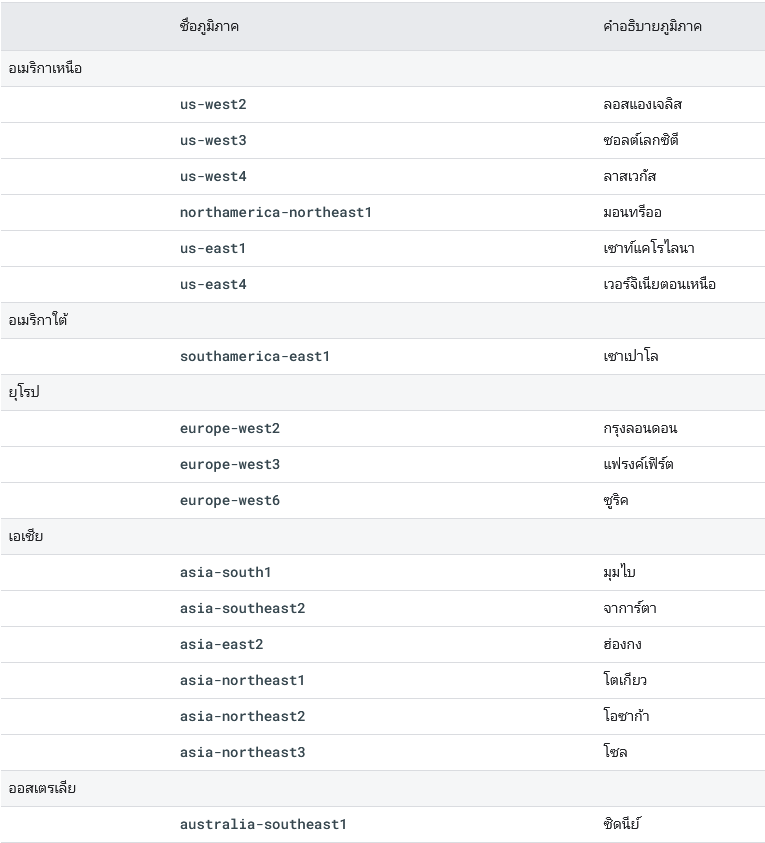
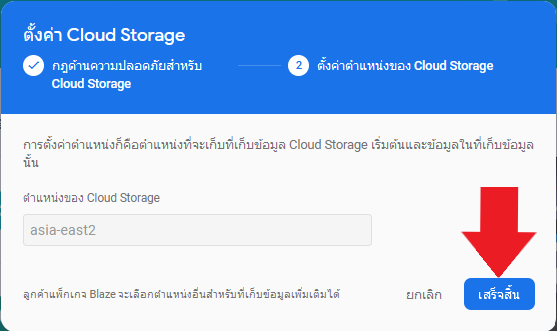
ขั้นตอนที่ 1. คลิกที่ ตำแหน่ง Cloud Firestore แล้วเลือกเป็น asia-east2 ตำแหน่งที่ตั้งมีผลต่อความไวในการเรียกข้อมูลของ Cloud Firestore เราจึงต้องเลือกที่ใกล้ประเทศไทยมากที่สุด นั้นคือ asia-east2
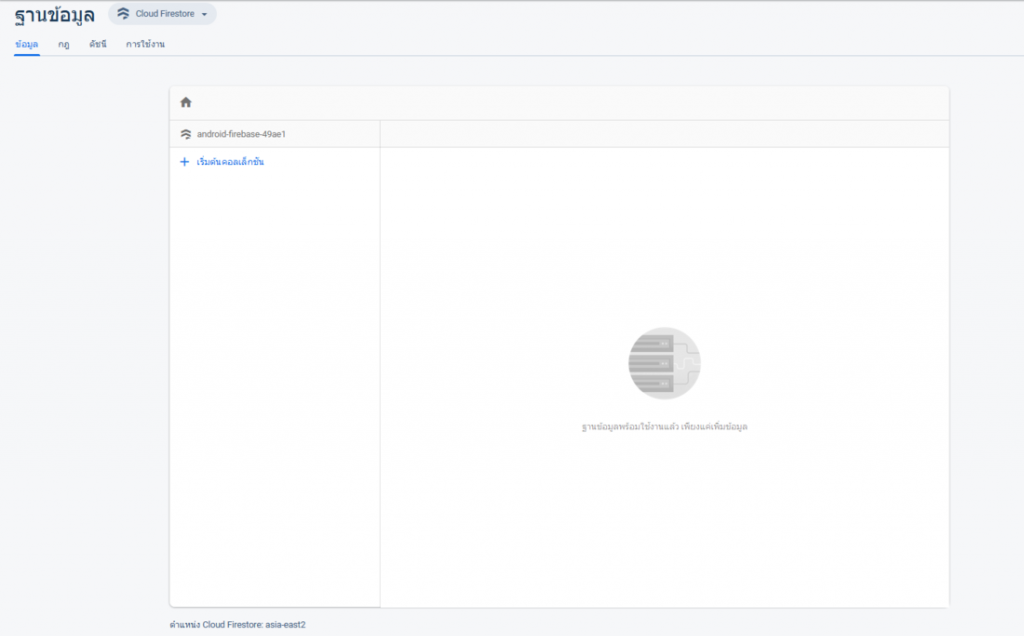
2. คลิก เสร็จเรียบร้อย จะปรากฎหน้า ฐานข้อมูล Cloud Firestore
ตอนนี้เราได้ติดตั้ง Firebase และ สร้าง Cloud Firestore กันไปแล้ว เราจะทำแอปกันต่อ
เริ่มเขียนแอพ
library ที่ต้องติดตั้ง คัดลอกไปวางที่ build.gradle(Module: app)
//Anko
implementation "org.jetbrains.anko:anko:$anko_version"
build.gradle(Project)
buildscript {
    ext.anko_version='0.10.8'
}
เราจะมาสร้างหน้า เพิ่มรายการอาหารและเครื่องดื่ม ก่อนอื่นเราจะมาทำปุ่ม ลิงก์ไปหน้า เพิ่มรายการอาหารและเครื่องดื่ม กัน
เราจะมาสร้างไอคอน ที่จะเอาไปใส่ปุ่ม โดยเราจะใช้ของ android studio ในการสร้าง
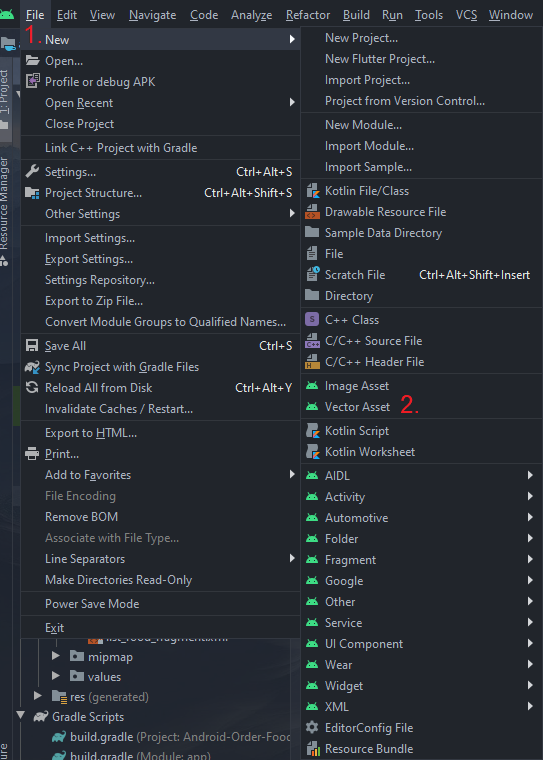
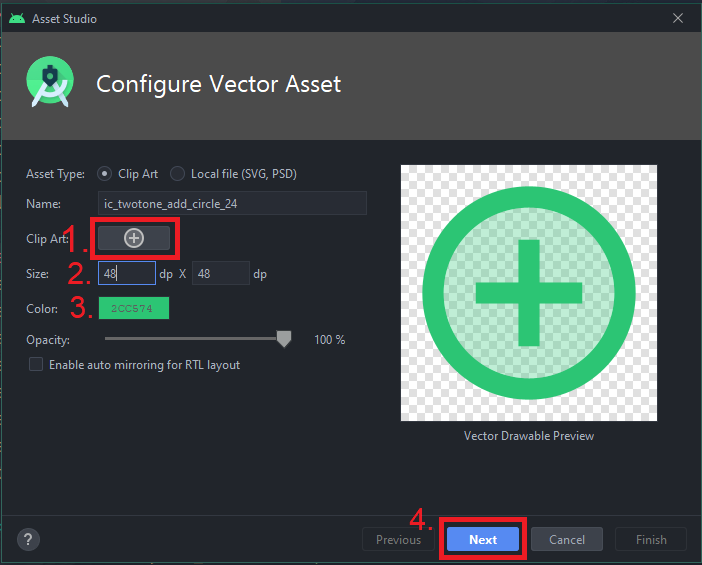
ขั้นตอน 1. คลิกที่ File แล้ว คลิกที่ New 2. คลิก Vector Asset ปรากฏหน้า Configure Vector Asset
ขั้นตอนสร้างไอคอน
- 1. คลิกเลือกไอคอนที่ต้องการจะใช้งาน
- 2. เลือกขนาดไอคอน
- 3. เลือกสีไอคอน
- 4. คลิก Next
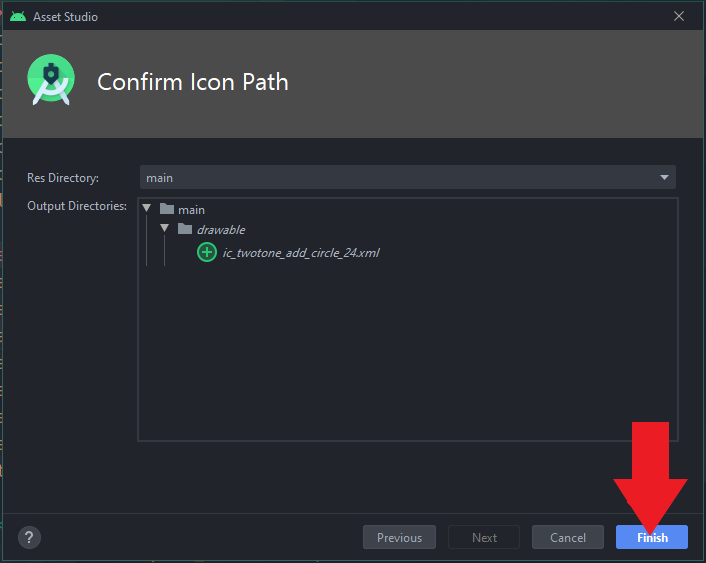
คลิกที่ Finish เป็นการยืนยันการสร้างไอคอนเสร็จสมบูรณ์ ต่อมาเราจะมาทำ Layout ปุ่ม
เพิ่มโค้ดลง ที่ activity_main.xml
//activity_main.xml
<androidx.cardview.widget.CardView
            android:id="@+id/add_food_drink"
            android:layout_width="150dp"
            android:layout_height="160dp"
            android:layout_margin="12dp"
            app:cardCornerRadius="16dp"
            app:cardElevation="6dp"
            app:layout_columnWeight="1">

            <LinearLayout
                android:layout_width="match_parent"
                android:layout_height="match_parent"
                android:layout_gravity="center"
                android:background="@drawable/btn_bg"
                android:gravity="center"
                android:orientation="vertical"
                android:padding="16dp"
                tools:ignore="UseCompoundDrawables">

                <ImageView
                    android:layout_width="80dp"
                    android:layout_height="80dp"
                    android:contentDescription="@string/todo"
                    android:src="@drawable/ic_twotone_add_circle_24" />

                <TextView
                    android:layout_width="wrap_content"
                    android:layout_height="wrap_content"
                    android:text="@string/create_food_drink"
                    android:layout_gravity="center"
                    android:gravity="center"
                    android:textColor="@color/colorBlack"
                    android:textSize="18sp" />
            </LinearLayout>
        </androidx.cardview.widget.CardView>
อันนี้โค้ด ลิงก์ ไปหน้า CreateFoodDrinkActivity.kt
//MainActivity.kt
private fun initInstances() {
        add_food_drink.setOnClickListener{
            val intent = Intent(this, CreateFoodDrinkActivity::class.java)
            startActivity(intent)
        }
}
เรามาสร้าง Empty Activity โดยตั้งชื่อว่า CreateFoodDrinkActivity จากนั้นเราจะมาสร้าง layout ของหน้า CreateFoodDrink
อันนี้ คือ ข้อความที่จะใช้ในหน้า Create Food Drink คัดลอกไปวางที่ strings.xml เลยครับ
//strings.xml
<resources>
 <!--food_drink Screen-->
 <string name="create_food_drink">สร้างอาหารและเครื่องดื่ม</string>
 <!--food_drink Screen End-->

 <!--add food drink Screen-->
    <string name="food">อาหาร</string>
    <string name="drink">เครื่องดื่ม</string>
    <string name="category">ประเภท</string>
    <string name="name_food_drink">ชื่ออาหารหรือเครื่องดื่ม</string>
    <string name="cal_food_drink">แคลอรี่อาหารหรือเครื่องดื่ม</string>
    <string name="price_food_drink">ราคาอาหารหรือเครื่องดื่ม</string>
    <string name="create_list">สร้าง</string>
 <!--add food drink Screen End-->
</resources>
โค้ดหน้า Layout activity_create_food_drink.xml
//activity_create_food_drink.xml
<?xml version="1.0" encoding="utf-8"?>
<LinearLayout xmlns:android="http://schemas.android.com/apk/res/android"
    xmlns:app="http://schemas.android.com/apk/res-auto"
    xmlns:tools="http://schemas.android.com/tools"
    android:id="@+id/add_food_drink_activity"
    android:layout_width="match_parent"
    android:layout_height="match_parent"
    android:background="@drawable/asset1xxxhdpi"
    android:orientation="vertical"
    tools:context=".ui.addfooddrink.AddFoodDrinkActivity">

    <androidx.appcompat.widget.Toolbar
        android:id="@+id/toolbar_add_food_drink"
        android:layout_width="match_parent"
        android:layout_height="wrap_content"
        android:background="?attr/colorPrimary"
        android:minHeight="?attr/actionBarSize"
        android:theme="?attr/actionBarTheme">

        <TextView
            android:id="@+id/tv_toolbar_title_add_food_drink"
            android:layout_width="wrap_content"
            android:layout_height="wrap_content"
            android:layout_gravity="center"
            android:gravity="center"
            android:maxLines="1"
            android:textColor="@color/colorDarkGreen"
            android:textSize="22sp" />
    </androidx.appcompat.widget.Toolbar>

    <RelativeLayout
        android:layout_width="wrap_content"
        android:layout_height="wrap_content"
        android:layout_gravity="center">

        <de.hdodenhof.circleimageview.CircleImageView
            android:id="@+id/image_food_drink"
            android:layout_width="128dp"
            android:layout_height="128dp"
            android:layout_marginTop="15dp"
            android:layout_marginBottom="15dp"
            android:src="@mipmap/ic_launcher_round"
            app:civ_border_color="#FF000000"
            app:civ_border_width="2dp" />

        <ImageButton
            android:id="@+id/add_image_food_drink"
            android:layout_width="35dp"
            android:layout_height="35dp"
            android:layout_alignTop="@id/image_food_drink"
            android:layout_alignEnd="@id/image_food_drink"
            android:layout_alignRight="@id/image_food_drink"
            android:layout_alignParentBottom="false"
            android:layout_marginTop="101dp"
            android:layout_marginEnd="9dp"
            android:layout_marginRight="9dp"
            android:background="@drawable/btn_add_img"
            android:contentDescription="@string/todo"
            android:src="@drawable/ic_twotone_create_24" />
    </RelativeLayout>

    <LinearLayout
        android:layout_width="match_parent"
        android:layout_height="0dp"
        android:layout_weight="1"
        android:orientation="vertical"
        android:padding="20dp">

        <TextView
            android:id="@+id/textView"
            android:layout_width="match_parent"
            android:layout_height="wrap_content"
            android:text="@string/category"
            android:textSize="16sp" />

        <RadioGroup
            android:id="@+id/radio_group_food_drink"
            android:layout_width="match_parent"
            android:layout_height="wrap_content"
            android:orientation="horizontal">

            <RadioButton
                android:id="@+id/radio_btn_food"
                android:layout_width="wrap_content"
                android:layout_height="wrap_content"
                android:layout_weight="1"
                android:text="@string/food" />

            <RadioButton
                android:id="@+id/radio_btn_drink"
                android:layout_width="wrap_content"
                android:layout_height="wrap_content"
                android:layout_weight="1"
                android:text="@string/drink" />
        </RadioGroup>

        <com.google.android.material.textfield.TextInputLayout
            android:id="@+id/txt_layout_name_food_drink"
            style="@style/Widget.MaterialComponents.TextInputLayout.OutlinedBox"
            android:layout_width="match_parent"
            android:layout_height="wrap_content"
            android:enabled="true"
            android:hint="@string/name_food_drink"
            app:boxStrokeColor="@color/colorTeal"
            app:helperTextEnabled="true"
            app:hintTextColor="@color/colorTeal">

            <com.google.android.material.textfield.TextInputEditText
                android:id="@+id/edit_name_food_drink"
                android:layout_width="match_parent"
                android:layout_height="wrap_content"
                android:inputType="text" />
        </com.google.android.material.textfield.TextInputLayout>

        <com.google.android.material.textfield.TextInputLayout
            android:id="@+id/txt_layout_cal_food_drink"
            style="@style/Widget.MaterialComponents.TextInputLayout.OutlinedBox"
            android:layout_width="match_parent"
            android:layout_height="wrap_content"
            android:layout_marginTop="5dp"
            android:hint="@string/cal_food_drink"
            app:boxStrokeColor="@color/colorTeal"
            app:helperTextEnabled="true"
            app:hintTextColor="@color/colorTeal">

            <com.google.android.material.textfield.TextInputEditText
                android:id="@+id/edit_cal_food_drink"
                android:layout_width="match_parent"
                android:layout_height="wrap_content"
                android:inputType="number" />
        </com.google.android.material.textfield.TextInputLayout>

        <com.google.android.material.textfield.TextInputLayout
            android:id="@+id/txt_layout_price_food_drink"
            style="@style/Widget.MaterialComponents.TextInputLayout.OutlinedBox"
            android:layout_width="match_parent"
            android:layout_height="wrap_content"
            android:layout_marginTop="5dp"
            android:hint="@string/price_food_drink"
            app:boxStrokeColor="@color/colorTeal"
            app:helperTextEnabled="true"
            app:hintTextColor="@color/colorTeal">

            <com.google.android.material.textfield.TextInputEditText
                android:id="@+id/edit_price_food_drink"
                android:layout_width="match_parent"
                android:layout_height="wrap_content"
                android:inputType="number" />
        </com.google.android.material.textfield.TextInputLayout>
    </LinearLayout>

    <Button
        android:id="@+id/button_create_list"
        android:layout_width="match_parent"
        android:layout_height="wrap_content"
        android:layout_margin="10dp"
        android:text="@string/create_list"
        app:backgroundTint="#2D48DF" />
</LinearLayout>
วิธีการสร้าง Toolbar ในแบบอื่นๆ นอกจากการวางในหน้า layout เลย เช่น
Android Custom Toolbar https://medium.com/@todspolwonhchomphu/android-custom-toolbar-af651e2bf2d6
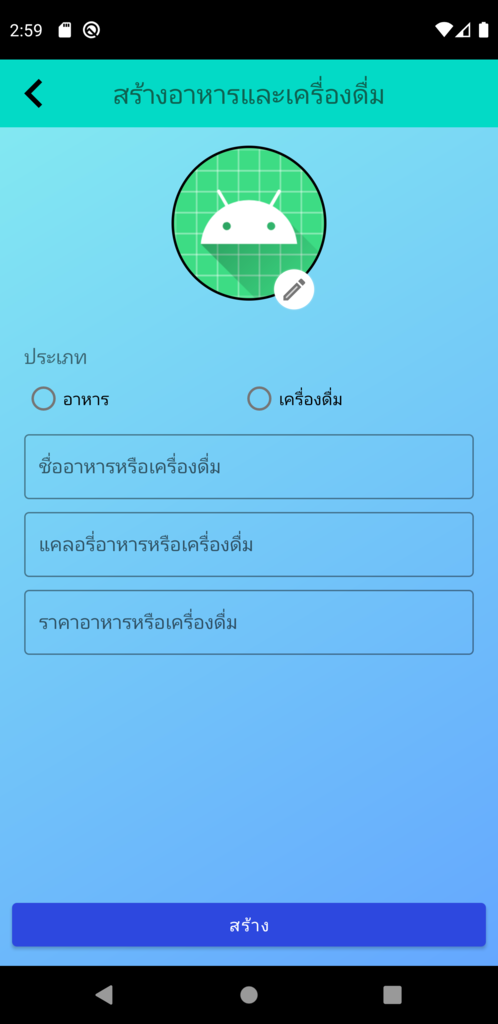
เราจะใช้ Layout RelativeLayout ในการจัดวางให้ CircleImageView กับ ImageButton ซ้อนกันดังในภาพข้างล่าง ส่วนประเภท จะใช้ RadioGroup ในการแบ่งประเภท อาหาร กับ เครื่องดื่ม ในตอนเก็บข้อมูลลง Cloud Firestore
Android Design – Relative Layout คืออะไร ? + อธิบายพร้อมภาพปลากรอบ https://devahoy.com/blog/2014/11/android-design-relative-layout-tutorial/
เราจะมาเขียนฟังก์ชั่นการทำงานของหน้า เพิ่มรายการอาหารและเครื่องดื่ม พร้อมกับเพิ่มข้อมูลลงใน Cloud Firestore และเก็บรูปภาพลงใน Cloud Storage for Firebase
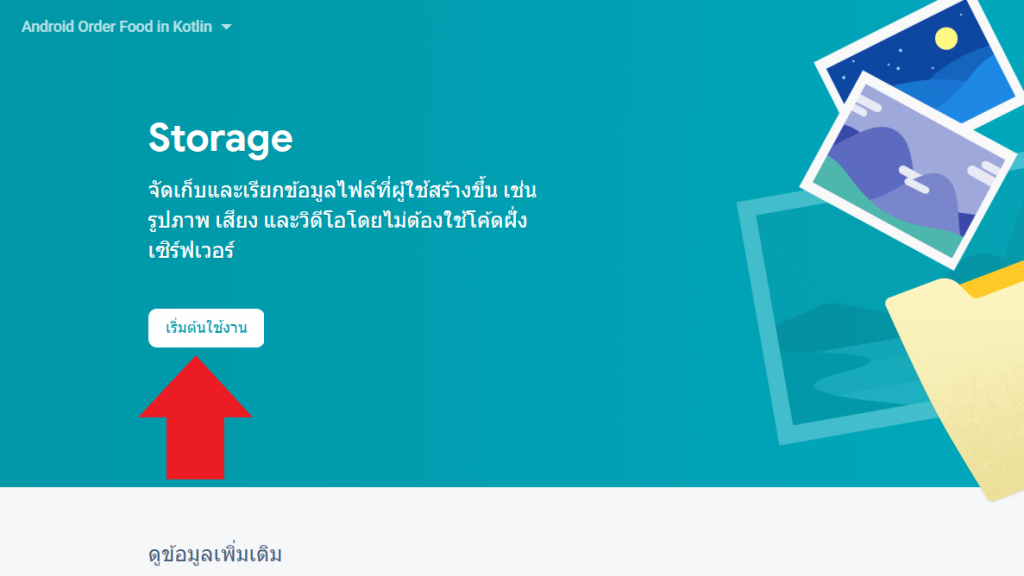
เราจะมาสร้าง Cloud Firestore for Firebase กันก่อน กลัยไปที่ Firebase คลิกที่ Storage
แล้วจะปรากฏหน้า Cloud Storage for Firebase
Cloud Storage for Firebase คืออะไร หลักการทำงาน สามารถอ่านได้ที่ https://medium.com/firebasethailand/%E0%B8%A3%E0%B8%B9%E0%B9%89%E0%B8%88%E0%B8%B1%E0%B8%81-firebase-storage-%E0%B8%95%E0%B8%B1%E0%B9%89%E0%B8%87%E0%B9%81%E0%B8%95%E0%B9%88-zero-%E0%B8%88%E0%B8%99%E0%B9%80%E0%B8%9B%E0%B9%87%E0%B8%99-hero-e65db2d1873f
คลิกเริ่มต้นใช้งาน จะปรากฏหน้า ตั้งค่า Cloud Storage
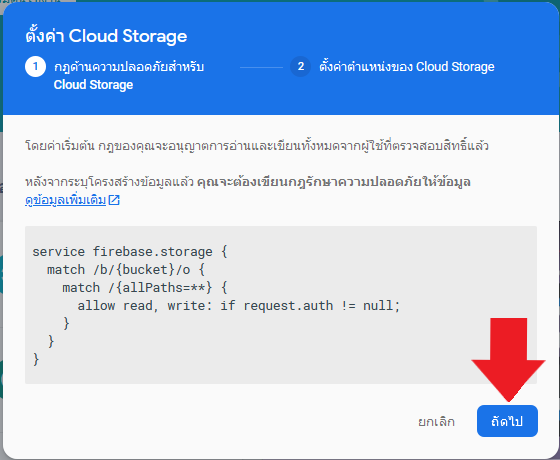
คลิก ถัดไป
คลิก เสร็จสิ้น จะปรากฏหน้า Cloud Storage ที่ยังไม่มีรูปภาพ

คลิกที่ Rules เราจะแก้ไขกฎให้เป็น สาธารณะ ไว้ก่อน การตั้งเป็น สาธารณะ นั้นจะไม่ปลอดภัย ส่วนวิธีตั้งสามารถอ่านได้ที่ https://medium.com/firebasethailand/%E0%B8%A3%E0%B8%B9%E0%B9%89%E0%B8%88%E0%B8%B1%E0%B8%81-security-rules-%E0%B9%83%E0%B8%99-firebase-realtime-database-b1840fdc2703

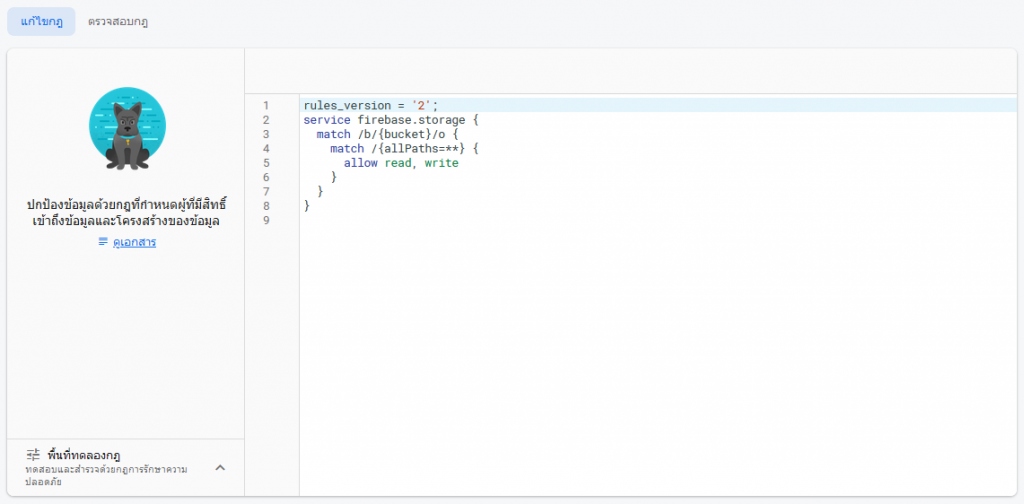
แก้ไขโค้ด เป็นตามข้างล่าง
service firebase.storage {
  match /b/{bucket}/o {
    match /{allPaths=**} {
      allow read, write
    }
  }
}
ตอนนี้เราได้ Cloud Storage แล้ว กลับมาที่ android studio มาทำฟังก์ชั่นการทำงานของหน้า สร้างรายการอาหารและเครื่องดื่ม
เราจะมาเขียนโค้ดของ Toolbar
//CreateFoodDrinkActivity.kt
   private fun initToolbar() {
        setSupportActionBar(toolbar_add_food_drink)
        supportActionBar!!.setDisplayHomeAsUpEnabled(true)
        supportActionBar!!.setDisplayShowHomeEnabled(true)
        supportActionBar!!.title = null
        toolbar_add_food_drink.setNavigationIcon(R.drawable.ic_chevron_left_black_48dp)
        toolbar_add_food_drink.setNavigationOnClickListener {
            onBackPressed()
        }
        tv_toolbar_title_add_food_drink.text = "สร้างอาหารและเครื่องดื่ม"
    }
เราจะมาดักเมื่อ กดกรอกข้อความลงใน TextInputEditText จะมี Keyboard ขึ้นมา เราดักเมื่อกดข้างนอก TextInputEditText จะให้ Keyboard หายไป
create_food_drink_activity เป็น id ของ LinearLayout หน้า activity_create_food_drink.xml
private fun initInstances() {
   create_food_drink_activity.setOnClickListener {
            hideKeyboard()
   }
}

private fun hideKeyboard() {}
โค้ดคำสั่ง เมื่อกดข้างนอก TextInputEditText จะทำให้ Keyboard หายไป
private fun View.hideKeyboard() {
        val view = this.currentFocus
        view?.let { v ->
            val imm = getSystemService(Context.INPUT_METHOD_SERVICE) as? InputMethodManager
            imm?.hideSoftInputFromWindow(v.windowToken, 0)
        }
    }
เราจะมาทำคำสั่งเรียกรูปภาพแล้วนำมาแสดง พร้อมกับเพิ่มรูปภาพลงใน Cloud Storage
ทำ setOnClickListener ก่อน
class CreateFoodDrinkActivity : AppCompatActivity() {

   private fun initInstances() {
     image_food_drink.setOnClickListener {
            pickImage()
     }
     add_image_food_drink.setOnClickListener {
            pickImage()
     }
   }

   private fun pickImage() {}
}
โค้ดคำสั่งเรียกรูปภาพ จาก gallery
//ประกาศตัวแปร ชื่อ REQUEST_GALLERY = 1
private val REQUEST_GALLERY = 1

private fun pickImage() {
    //ประกาศตัวแปร ชื่อ intent แล้วกำหนด = Intent()
    val intent = Intent()
    //กำหนด intent เป็น type ของข้อมูลให้เป็นไฟล์ภาพทั้งหมด "image/*"
    intent.type = "image/*"
    //intent เป็น ACTION_GET_CONTENT แทน
    intent.action = Intent.ACTION_GET_CONTENT
    //REQUEST_GALLERY คือ Request Code เอาไว้เช็คว่าข้อมูลที่ส่งกลับมา
    startActivityForResult(Intent.createChooser(intent, "Select Picture"), REQUEST_GALLERY)
}
//ประกาศ categoryFoodDrink เป็นค่าว่าง เอาไว้เก็บข้อความจาก RadioButton
private var categoryFoodDrink = ""
//radioButton เป็น RadioButton
private lateinit var radioButton: RadioButton
private fun initInstances() {
radio_group_food_drink.setOnCheckedChangeListener { group: RadioGroup?, checkedId: Int ->
radioButton = radio_group_food_drink.findViewById(checkedId)
when (checkedId) {
//เมื่อกด radio_btn_food ให้ categoryFoodDrink = "food"
R.id.radio_btn_food -> categoryFoodDrink = "food"
//เมื่อกด radio_btn_food ให้ categoryFoodDrink = "drink"
R.id.radio_btn_drink -> categoryFoodDrink = "drink"
}
}
}private val db = FirebaseFirestore.getInstance()
private var imageUri: Uri? = null
private var storageRef: StorageReference? = null
private var imageFoodDrink: String = ""
override fun onActivityResult(requestCode: Int, resultCode: Int, data: Intent?) {
super.onActivityResult(requestCode, resultCode, data)
if (categoryFoodDrink == "") {
toast("กรุณาเลือกประเภท")
} else {
//กำหนดให้ storageRef รับค่า Instance พร้อมกับ อ้างอิงถึง โฟลเดอร์ categoryFoodDrink ด้วยใช้ child()
storageRef = FirebaseStorage.getInstance().reference.child(categoryFoodDrink)
if (requestCode == REQUEST_GALLERY && resultCode == RESULT_OK && data!!.data != null) {
// imageUri ที่ประกาศ ไว้ เท่ากับ data.data
imageUri = data.data
try {
//ทำการแปลง imageUri เป็น Bitmap
val bitmap = MediaStore.Images.Media.getBitmap(this.contentResolver, imageUri)
//แสดงภาพที่เลือกจาก Gallery ขึ้น CircleImageView
image_food_drink.setImageBitmap(bitmap)
toast("uploading....")
uploadImageToDatabase()
} catch (e: FileNotFoundException) {
e.printStackTrace()
} catch (e: IOException) {
e.printStackTrace()
}
}
}
}
private fun uploadImageToDatabase() {}เราจะกำหนดเงื่อนไข categoryFoodDrink = “” ถ้าเป็นจริง จะมีข้อความประกาศว่า กรุณาเลือกประเภท ถ้าเป็นเท็จ จะมาทำการดึงรูปภาพมาแสดง พร้อมกับเพิ่มรูปภาพลงใน Firebase Storage
เราจะมาทำการเก็บ Url ลงใน imageFoodDrink เพื่อนำไปใช้ตอนเพิ่มรายการอาหารหรือเครื่องดื่ม ลงใน Cloud Firestore
private fun uploadImageToDatabase() {
        //ประกาศ progressBar = ProgressDialog
        val progressBar = ProgressDialog(this)
        //กำหนด ข้อความปรากฎขึ้น
        progressBar.setMessage("image is uploading, please wait...")
        //กำหนด ProgressDialog แสดง
        progressBar.show()

        if (imageUri != null) {
            //กำหนดให้ fileRef รับค่า storageRef พร้อมอ้างอิงถึง ไฟล์ ที่ได้ เป็น .jpg
            val fileRef = storageRef!!.child(System.currentTimeMillis().toString() + ".jpg")

            val uploading: StorageTask<*>
            //uploading รับค่าโดยใช้คำสั่ง putFile() ในการอัพโหลด
            uploading = fileRef.putFile(imageUri!!)

            uploading.continueWithTask(Continuation<UploadTask.TaskSnapshot, Task<Uri>> { task ->
                if (task.isSuccessful) {
                    task.exception?.let {
                        throw it
                    }
                }
                return@Continuation fileRef.downloadUrl
            }).addOnCompleteListener { task ->
                if (task.isSuccessful) {
                    val downloadUrl = task.result
                    //แปลง downloadUrl เป็น String
                    val url = downloadUrl.toString()
                    imageFoodDrink = url
                    //กำหนด ProgressDialog ปิด
                    progressBar.dismiss()
                }
            }
        }
    }
Pregess Dialog คือ Popup ปรากฎตอนคลิก และ หายไปตอนทำงานสำเร็จ นอกจาก Pregess Dialog ยังมี Dialog อื่นๆ อีกสามารถอ่านได้ที่นี้ https://devahoy.com/blog/2014/04/android-dialog-and-custom-dialog-example/
เราทำฟังก์ชั่นปุ่มบันทึก ที่เพิ่มข้อมูล ลงใน Cloud Firestore พร้อมเช็ดว่า TextInputEditText ไม่เป็นค่าว่าง
private fun initInstances() {
   button_save_add.setOnClickListener {
         addToFirebaseFirestore()
  }
}

private fun addToFirebaseFirestore() {}
private fun addToFirebaseFirestore() {
val dialog: android.app.AlertDialog? = SpotsDialog.Builder().setContext(this).build()
val editNameFoodDrink = edit_name_food_drink.text.toString().trim { it <= ' ' }
val editCalFoodDrink = edit_cal_food_drink.text.toString().trim { it <= ' ' }
val editPriceFoodDrink = edit_price_food_drink.text.toString().trim { it <= ' ' }
if (categoryFoodDrink.isEmpty()) {
toast("กรุณาเลือกประเภท")
return
}
if (imageFoodDrink.isEmpty()) {
toast("กรุณาเลือกรูปภาพ")
return
}
if (editNameFoodDrink.isEmpty()) {
toast("กรุณากรอกชื่อ.")
return
}
if (editCalFoodDrink.isEmpty()) {
toast("กรุณากรอก cal.")
return
}
if (editPriceFoodDrink.isEmpty()) {
toast("กรุณากรอกราคา.")
return
}
}เมื่อกดปุ่มบันทึก เราให้เช็ดว่างแต่ละช่อง ไม่เป็นค่าว่าง ถ้าเป็นค่าว่าง จะแสดงข้อความแจ้งเตือนให้กรอกหรือเลือก ส่วน dialog เป็น library Popup อีกตัวที่เอามาใช้ให้ดู โดย Popup ตัวนี้ แสดง Loading ว่ากำลังโหลดอยู่ เหมือนกับ Pregess Dialog
private fun addToFirebaseFirestore() {

  //ข้อมูลที่เรากรอก
  val docData = hashMapOf(
            "img" to imageFoodDrink,
            "name" to editNameFoodDrink,
            "col" to editCalFoodDrink.toInt(),
            "price" to editPriceFoodDrink.toInt(),
            "createAt" to Timestamp(Date())
        )

  //ให้แสดง dialog
  dialog!!.show()document
        // collection ชื่อ ตาม categoryFoodDrink
        // document ให้ firebase สุ่มชื่อให้
        // ส่งข้อมูล docData ชึ้นไป
        db.collection(categoryFoodDrink).document()
            .set(docData)
             ถ้าสำเร็จ กลับไปหน้า dashboard
            .addOnSuccessListener {
                //ให้ปิด dialog
                dialog.dismiss()
                //ให้แสดงข้อความ
                toast("Create successfully!")
                //ลิงก์กลับไป หน้า dashboard
                startActivity(
                    Intent(
                        this,
                        MainActivity::class.java
                    )
                )
                finish()
            }
            ถ้าไม่สำเร็จจะแสดงข้อความแจ้งเตือน
            .addOnFailureListener { e ->
                toast("Error writing document $e")
                 //ให้ปิด dialog
                dialog.dismiss()
            }
}
อันคือโค้ดตัวเต็ม
package com.example.android_order_food_in_kotlin.view.ui.addfooddrink

import android.app.ProgressDialog
import android.content.Context
import android.content.Intent
import android.net.Uri
import android.os.Bundle
import android.provider.MediaStore
import android.view.inputmethod.InputMethodManager
import android.widget.RadioButton
import android.widget.RadioGroup
import androidx.appcompat.app.AppCompatActivity
import com.example.android_order_food_in_kotlin.R
import com.example.android_order_food_in_kotlin.view.ui.MainActivity
import com.google.android.gms.tasks.Continuation
import com.google.android.gms.tasks.Task
import com.google.firebase.Timestamp
import com.google.firebase.firestore.FirebaseFirestore
import com.google.firebase.storage.FirebaseStorage
import com.google.firebase.storage.StorageReference
import com.google.firebase.storage.StorageTask
import com.google.firebase.storage.UploadTask
import dmax.dialog.SpotsDialog
import kotlinx.android.synthetic.main.activity_add_food_drink.*
import org.jetbrains.anko.toast
import java.io.FileNotFoundException
import java.io.IOException
import java.util.*

class CreateFoodDrinkActivity : AppCompatActivity() {

    private val db = FirebaseFirestore.getInstance()
    private lateinit var radioButton: RadioButton
    private var categoryFoodDrink = ""
    private val REQUEST_GALLERY = 1
    private var imageUri: Uri? = null
    private var storageRef: StorageReference? = null
    private var imageFoodDrink: String = ""

    override fun onCreate(savedInstanceState: Bundle?) {
        super.onCreate(savedInstanceState)
        setContentView(R.layout.activity_add_food_drink)
        initInstances()
        initToolbar()
    }

    private fun initInstances() {
        radio_group_food_drink.setOnCheckedChangeListener { group: RadioGroup?, checkedId: Int ->
            radioButton = radio_group_food_drink.findViewById(checkedId)
            when (checkedId) {
                R.id.radio_btn_food -> categoryFoodDrink = "food"
                R.id.radio_btn_drink -> categoryFoodDrink = "drink"
            }
        }
        image_food_drink.setOnClickListener {
            pickImage()
        }
        add_image_food_drink.setOnClickListener {
            pickImage()
        }
        add_food_drink_activity.setOnClickListener {
            hideKeyboard()
        }
        button_save_add.setOnClickListener {
            addToFirebaseFirestore()
        }
    }

    private fun initToolbar() {
        setSupportActionBar(toolbar_add_food_drink)
        supportActionBar!!.setDisplayHomeAsUpEnabled(true)
        supportActionBar!!.setDisplayShowHomeEnabled(true)
        supportActionBar!!.title = null
        toolbar_add_food_drink.setNavigationIcon(R.drawable.ic_chevron_left_black_48dp)
        toolbar_add_food_drink.setNavigationOnClickListener {
            onBackPressed()
        }
        tv_toolbar_title_add_food_drink.text = "เพิ่มรายการอาหารและเครื่องดื่ม"

    }

    private fun pickImage() {
        val intent = Intent()
        intent.type = "image/*"
        intent.action = Intent.ACTION_GET_CONTENT
        startActivityForResult(Intent.createChooser(intent, "Select Picture"), REQUEST_GALLERY)
    }

    override fun onActivityResult(requestCode: Int, resultCode: Int, data: Intent?) {
        super.onActivityResult(requestCode, resultCode, data)
        if (categoryFoodDrink == "") {
            toast("กรุณาเลือกประเภท")
        } else {
            storageRef = FirebaseStorage.getInstance().reference.child(categoryFoodDrink)
            if (requestCode == REQUEST_GALLERY && resultCode == RESULT_OK && data!!.data != null) {
                imageUri = data.data
                try {
                    val bitmap = MediaStore.Images.Media.getBitmap(this.contentResolver, imageUri)
                    image_food_drink.setImageBitmap(bitmap)
                    toast("uploading....")
                    uploadImageToDatabase()
                } catch (e: FileNotFoundException) {
                    e.printStackTrace()
                } catch (e: IOException) {
                    e.printStackTrace()
                }
            }
        }
    }

    private fun uploadImageToDatabase() {
        val progressBar = ProgressDialog(this)
        progressBar.setMessage("image is uploading, please wait...")
        progressBar.show()

        if (imageUri != null) {
            val fileRef = storageRef!!.child(System.currentTimeMillis().toString() + ".jpg")

            val uploading: StorageTask<*>
            uploading = fileRef.putFile(imageUri!!)

            uploading.continueWithTask(Continuation<UploadTask.TaskSnapshot, Task<Uri>> { task ->
                if (task.isSuccessful) {
                    task.exception?.let {
                        throw it
                    }
                }
                return@Continuation fileRef.downloadUrl
            }).addOnCompleteListener { task ->
                if (task.isSuccessful) {
                    val downloadUrl = task.result
                    val url = downloadUrl.toString()
                    imageFoodDrink = url
                    progressBar.dismiss()
                }
            }
        }
    }

    private fun hideKeyboard() {
        val view = this.currentFocus
        view?.let { v ->
            val imm = getSystemService(Context.INPUT_METHOD_SERVICE) as? InputMethodManager
            imm?.hideSoftInputFromWindow(v.windowToken, 0)
        }
    }

    private fun addToFirebaseFirestore() {
        val dialog: android.app.AlertDialog? = SpotsDialog.Builder().setContext(this).build()
        val editNameFoodDrink = edit_name_food_drink.text.toString().trim { it <= ' ' }
        val editCalFoodDrink = edit_cal_food_drink.text.toString().trim { it <= ' ' }
        val editPriceFoodDrink = edit_price_food_drink.text.toString().trim { it <= ' ' }

        if (categoryFoodDrink.isEmpty()) {
            toast("กรุณาเลือกประเภท")
            return
        }

        if (imageFoodDrink.isEmpty()) {
            toast("กรุณาเลือกรูปภาพ")
            return
        }

        if (editNameFoodDrink.isEmpty()) {
            toast("กรุณากรอกชื่อ.")
            return
        }

        if (editCalFoodDrink.isEmpty()) {
            toast("กรุณากรอก cal.")
            return
        }

        if (editPriceFoodDrink.isEmpty()) {
            toast("กรุณากรอกราคา.")
            return
        }

        val docData = hashMapOf(
            "img" to imageFoodDrink,
            "name" to editNameFoodDrink,
            "col" to editCalFoodDrink.toInt(),
            "price" to editPriceFoodDrink.toInt(),
            "createAt" to Timestamp(Date())
        )

        dialog!!.show()
        db.collection(categoryFoodDrink).document()
            .set(docData)
            .addOnSuccessListener {
                dialog.dismiss()
                toast("Create successfully!")
                startActivity(
                    Intent(
                        this,
                        MainActivity::class.java
                    )
                )
                finish()
            }
            .addOnFailureListener { e ->
                toast("Error writing document $e")
                dialog.dismiss()
            }
    }
}
ตอนนี้เราได้หน้า สร้างรายการอาหารแล้ว พร้อมกับเพิ่มข้อมูลลงใน Cloud Firestore กับเก็บรูปภาพใน Cloud Storage for Firebase แล้ว ในตอนหน้า เราจะนำข้อมูลที่เพิ่มลงไปใน Cloud Firestore มาแสดงในหน้ารายการอาหารและเครื่องดื่มกันนะครับ พร้อมกับมาทำหน้า layout order กัน
ไม่ยากเกินไปใช่ไหมครับ อย่าลืมว่าพวกเราช่วยคุณได้ ถ้าสนใจ ฮ่า ๆ ๆ ๆ
Twinsynergy #ออกและพัฒนาเว็บไซต์ #ทำเว็บไซต์และแอปพลิเคชั่น #พัฒนาซอฟแวร์ #Website #MobileApplication #Dev #WebDesign
📌สนใจติดต่อ📌
💻 https://area51.twinsynergy.co.th
📱 063-789-9059