ทำ Nextjs ใช้งานบน Firebase
ช่วงหลังมานี้งานไหนที่ต้องทำมีหน้าเว็บแล้วต้องรองรับ SEO ด้วย ทีมผมจะใช้งาน Nextjs เป็นหลัก ซึ่งปกติผมก็ deploy มันบน Docker และมันจะมีค่าใช้จ่ายรายเดือนในส่วนของการเช่าเครื่อง + domain + ssl
ผมเลยอยากลอง deploy Nextjs ให้ไปใช้งานบน Firebase hosting เพื่อที่จะได้ประหยัดค่าใช้จ่ายเริ่มต้นของโปรเจ็คด้วย หลักการของมันก็คือเราจะ deploy Nextjs ไปไว้ใน Cloud function จากนั้นเอา Firebase hosting ให้มาอ่านไฟล์ใน Cloud function แทน

เราก็จะได้ Nextjs ที่มี domain + ssl มาใช้งานฟรีๆ ในช่วงเริ่มต้น ซึ่งเอาตามจริง ผมยังไม่เห็นประโยชน์อื่นใดของการทำแบบนี้นอกจากมันประหยัดในช่วงเริ่มต้นเลย ฮาๆ
วิธีการ Deploy Nextjs ใน Cloud function
ติดตั้ง nextjs
ใครยังไม่มี nextjs ก็ติดตั้งก่อน ใครมีแล้วก็ผ่านไป
npm init next-app nextjs-blog --example "https://github.com/vercel/next-learn-starter/tree/master/learn-starter"เราจะมี directory ประมาณนี้
./
├── README.md
├── node_modules
├── package.json
├── pages
├── public
└── yarn.lock
1. Configure Firebase
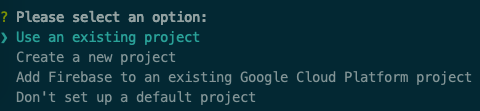
ให้เราสร้าง firebase config ขึ้นมาด้วย
firebase initโดยเลือก Hosting อย่างเดียว

เลือก Firebase project
ตั้งค่า Hosting ตามนี้
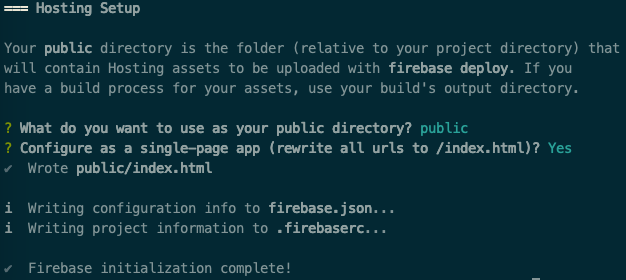
จากนั้นให้ลบไฟล์ public/index.html ออกเพื่อไม่ให้ firebase hosting อ่านไฟล์นี้ได้
rm public/index.htmlจากนั้นแก้ไขไฟล์ firebase.json ดังนี้
{
  "hosting": {
    "public": "public",
    "cleanUrls": true,
    "rewrites": [
      {
        "source": "**",
        "function": "nextjs-server"
      }
    ]
  },
  "functions": {
    "source": ".",
    "ignore": [
      "firebase.json",
      "firbease-debug.log",
      "**/.*",
      "**/node_modules/**",
      "components/**",
      "pages/**",
      "public/**",
      "readme.md"
    ]
  }
}
ในขั้นตอนนี้ Firebase hosting จะถูกเรียกไปยัง nextjs-server function แทนแล้ว
สุดท้ายไฟล์ที่มีจะเป็นแบบนี้
./
├── .firebaserc
├── .gitignore
├── README.md
├── firebase.json
├── node_modules
├── package-lock.json
├── package.json
├── pages
├── public
└── yarn.lock
2. Configure server code
ติดตั้ง package ที่จำเป็นก่อน
npm install --save firebase-admin firebase-functions
npm install --save-dev firebase-functions-test rimraf shelljs
สร้าง server.js ขึ้นมา
// server.js

const admin = require("firebase-admin");
const functions = require("firebase-functions");
const next = require("next");
const config = require("./next.config");

admin.initializeApp();

const dev = process.env.NODE_ENV !== "production";
const app = next({
  dev,
  // the absolute directory from the package.json file that initialises this module
  // IE: the absolute path from the root of the Cloud Function
  conf: config,
});
const handle = app.getRequestHandler();

const server = functions.https.onRequest((request, response) => {
  // log the page.js file or resource being requested
  console.log("File: " + request.originalUrl);
  return app.prepare().then(() => handle(request, response));
});

exports.nextjs = { server };
สร้าง next.config.js ขึ้นมา
// next.config.js

module.exports = {
  distDir: "nextjs",
};
สุดท้ายไฟล์ที่มีจะเป็นแบบนี้
./
├── .firebaserc
├── .gitignore
├── README.md
├── firebase.json
├── next.config.js
├── node_modules
├── package-lock.json
├── package.json
├── pages
├── public
├── server.js
└── yarn.lock
3. Configure build scripts
ใน package.json ให้เราแก้การ script ดังนี้
"scripts": {
    "clean": "rimraf nextjs/",
    "dev": "next dev",
    "build": "next build",
    "start": "next start",
    "predeploy": "npm run clean && next build",
    "deploy": "firebase deploy --only functions:nextjs,hosting"
  },
และเนื่องจาก Cloud function รองรับแค่ node 10 เราจึงต้องกำหนดให้ Nextjs ของเราใช้งานแค่ Node version 10 และให้มันไปเรียกไฟล์ server.js ก่อน
"main": "server.js",
  "engines": {
    "node": "10"
  }
หน้าตา package.json จะได้ประมาณนี้
{
  "name": "learn-starter",
  "version": "0.1.0",
  "private": true,
  "scripts": {
    "clean": "rimraf nextjs/",
    "dev": "next dev",
    "build": "next build",
    "start": "next start",
    "predeploy": "npm run clean && next build",
    "deploy": "firebase deploy --only functions:nextjs,hosting"
  },
  "dependencies": {
    "firebase-admin": "~8.12.1",
    "firebase-functions": "~3.6.2",
    "next": "9.3.5",
    "react": "16.13.1",
    "react-dom": "16.13.1"
  },
  "devDependencies": {
    "firebase-functions-test": "~0.2.1",
    "rimraf": "~3.0.2",
    "shelljs": "~0.8.4"
  },
  "main": "server.js",
  "engines": {
    "node": "10"
  }
}
อัพเดท .gitignore ให้มันไม่เอา nextjs/ ขึ้นไปเก็บใน git
# dependencies
/node_modules
/.pnp
.pnp.js

# testing
/coverage

# next.js
/.next/
/out/

# production
/build

# misc
.DS_Store

# debug
npm-debug.log*
yarn-debug.log*
yarn-error.log*

# local env files
.env.local
.env.development.local
.env.test.local
.env.production.local

nextjs/
4. วิธี deploy ขึ้น firebase
เรียกใช้คำสั่งตามนี้
npm install
npm run predeploy
npm run deploy
มาดูผลลัพธ์ในหน้า Functions ของ Firebase

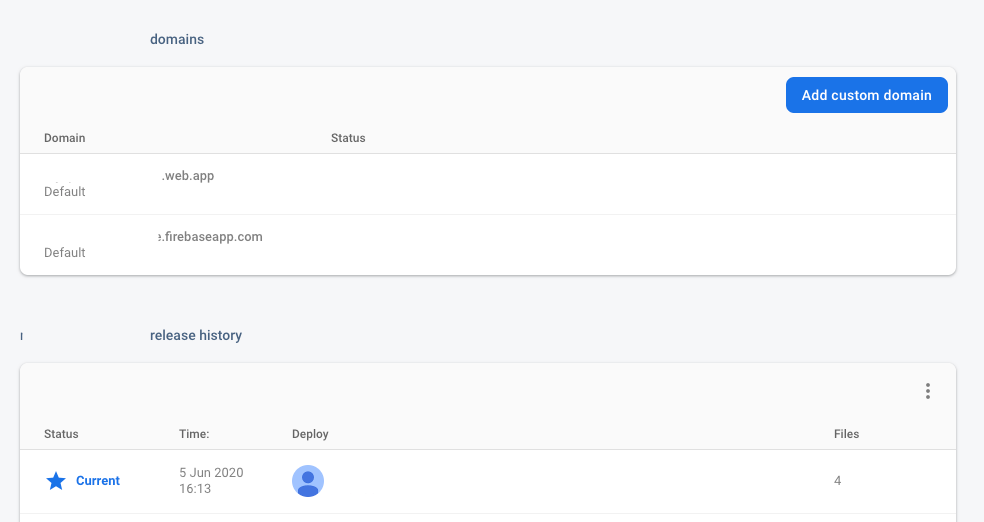
มาดูผลลัพธ์ในหน้า Hosting ของ Firebase
บทสรุป
เราสามารถพัฒนา Nextjs ได้ตามปกติโดยเราจะทำเว็บเป็นแบบ SSR เพื่อให้มันสามารถกำหนดค่า SEO ได้ในหน้าเว็บไซต์ และข้อควรระวังห้ามกำหนด Region ใน Cloud function ไม่งั้น Firebase hosting จะเข้าไปอ่าน Cloud function ไม่ได้ โดนมาแล้วกับตัว T.T แก้เป็นวันเลย
ตามไปดู code ได้เลย
https://gitlab.com/twin-opensource/nextjs-firebase
Thanks:
– medium.com/@muccy/deploying-next-js-app-to-firebase-functions-eb473791d79e
– github.com/jthegedus/firebase-gcp-examples/tree/master/functions-nextjs